


 Download code from GitHub
Chapter 2: Managing Domain Controllers
Active Directory domain controllers are your network's castles of identity. They offer services such as LDAP, Kerberos, and NTLM to people using devices, appliances, and servers. The previous chapter introduced the concepts of forests, trees, and domains. In this chapter, we are going to look at some more tangible things, such as server machines. But please don't take that literally; domain controllers these days are found to be virtual machines more often than physical machines.
I'll walk you through creating new domain controllers and show you which type of domain controller to implement. I'll also show you how to create domain controllers quickly, even when there's only a slow connection between the location with existing domain controllers and the location where you want to implement a new domain controller. We'll also look at creating hundreds of domain controllers quickly.
The following recipes are covered in this chapter:
- Preparing a Windows server to become a domain controller
- Promoting a server to a domain controller
- Using Install From Media (IFM)
- Using domain controller cloning
- Determining whether a virtual domain controller has a VM-GenerationID
- Demoting a domain controller
- Demoting a domain controller forcefully
- Inventory domain controllers
- Decommissioning a compromised read-only domain controller
Preparing a Windows server to become a domain controller
To make Active Directory a reliable service in any networking environment, the domain controllers need to be available with high integrity. Any changes an administrator needs to make to a deployed domain controller might diminish the availability. Any component or configuration that is misbehaving might diminish the integrity. Therefore, let's look at how to prepare a Windows Server installation to become a domain controller before we promote it to become one.
The following steps are my time-tested recommended practices for production domain controllers within enterprises. I highly recommend these steps to create highly reliable domain controllers.
Intending to do the right thing
The first few items on the list of preparations involve having the right ideas about promoting domain controllers throughout their life cycles:
- Intend to create at least two domain controllers per Active Directory domain: This way, both servers can be advertised to networking clients as LDAP servers and DNS servers. Then, when you have to reboot one of at least two servers, these clients won't be hindered. Also, restoring a domain controller while another domain controller is still available allows for scenarios such as non-authoritative restores, domain controller cloning, and domain controller re-promotion.
- Intend to implement role separation: By any means, do not misuse a domain controller as an exchange server or SQL server, unless it's a Windows Small Business Server. The DNS server, DHCP server, and NPS server roles are gray areas here, which should be addressed with common sense; if it means a domain controller will be harder to restore, manage, or decommission, separate the roles.
Dimensioning the servers properly
Now, let's look at how to dimension intended domain controllers:
- Intend to create equal domain controllers in terms of hardware dimensions: It's tempting to place one big server and one smaller server as domain controllers but consider the possibility of having to move Flexible Single Master Operation (FSMO) roles or other loads from one domain controller to another. Since domain controllers are randomly assigned to networking clients inside an Active Directory site, clients accessing a server with fewer resources may not exhibit a consistent and acceptable user experience.
- Dimension the intended domain controllers properly in terms of hardware: Domain controllers offer the best performance when they can cache the Active Directory database,
ntds.dit, in RAM. Plan for ample room in RAM to cache up to 4 KB per Active Directory object, plus a 10 MB minimum for the main objects and partitions. You should start with the minimum RAM required to install Windows Server and then add on the additional memory for Active Directory Domain Services (AD DS). For physical servers, use RAID and separate spindles for storage of Active Directory-related data when possible. Use hardware that will be covered by the manufacturer's (extended) guarantee, support, and life cycle policies for the period in which you need to rely on the domain controller. - Dimension the intended domain controllers properly in terms of software: Use a version of Windows Server that will be covered by Microsoft's (extended) support and life cycle policies for the period in which you need to rely on the domain controller.
- Implement the Server Core version of Windows Server when possible: Server Core installations of Windows Server offer higher availability and a smaller attack surface compared to Windows Server installations with the Desktop Experience feature. However, some agents and other software components in use within the organization might not properly run on Server Core installations. In the latter scenario, Windows Server installations with the Desktop Experience feature (called Full Installations in previous versions of Windows Server) should be performed, obviously.
- Install the latest firmware for devices and/or integration components: On physical boxes that you intend to use as a domain controller, install the latest stable firmware for the Basic Input/Output System (BIOS), the storage controller(s), the video card(s), and Network Interface Card(s) (NIC(s)). On virtual machines, implement the latest stable version of the integration components or VMware tools and follow the recommended practices from the vendor of the hypervisor platform.
- Use a virtualization platform that offers the VM-GenerationID feature: Place virtual domain controllers on a virtualization platform that offers the VM-GenerationID feature. This will offer the domain controller virtualization safeguards that allow administrators to take snapshots of domain controllers without compromising the integrity of the Active Directory database. Also, domain controller cloning is available on these virtualization platforms.
Preparing the Windows Server installations
Before you install Windows Server on intended domain controllers, perform these actions:
- Run the memory diagnostics from the Windows Server installation media: The Windows Server DVD allows administrators to check the RAM of physical and virtual machines to ensure that the memory used by the Windows Server installation is not faulty. Checking beforehand means you don't have to replace faulty memory after going live.
- Run sysprep.exe on cloned disks: When the Windows Server installation is the result of the cloning of a disk with a Windows Server installation on it, ensure that the Windows Server installation is sysprepped. You wouldn't want the Security Identifier (SID) on the cloned disk to become the SID for the new Active Directory forest or domain you might be creating.
Preconfiguring the Windows servers
After Windows Server is installed, configure these items on the Windows Server instance, either through Server Manager on Windows Server installations with the Desktop Experience feature or by using sconfig.cmd on Server Core installations:
- Change the hostname for the Windows Server installation. Leverage the server naming convention and/or policy within the organization.
- Check for proper Windows activation of the Windows Server operating system.
- Update the Windows Server installation with the latest updates.
- Configure the server with at least one static IPv4 address and/or a static IPv6 address. Leverage the networking plan and zone assignment policies within the organization. Avoid multi-homing domain controllers.
Tip
When the intended domain controller is to run as a virtual machine within a cloud environment, such as Amazon's AWS or Microsoft's Azure, let the cloud provider assign the IPv4 and/or IPv6 addresses, because manually setting these addresses might break the connectivity of the Windows Server installation. Instead, use IP address reservations to ensure the intended domain controllers remain reachable over the same addresses.
- Check for at least one connected LAN connection: Without a connected LAN connection, the promotion of a domain controller will fail. This is by design.
- Configure a proper naming resolution: As the DNS plays a vital role in locating Active Directory, ensure the DNS is properly configured. Plan for an Active Directory-integrated DNS. Don't forget the DNS stub zones and/or conditional forwarders when creating a new Active Directory domain and/or forest. Deploy Windows Internet Name Service (WINS) or DNS GlobalNames zones in legacy environments.
- Configure the page file correctly.
- Implement information security measures: Deploy agents for anti-malware, uninterruptible power supplies, backup and restore, Security Incident and Event Management (SIEM), Technology State and Compliance Monitoring (TSCM), advanced threat analytics, and other information security measures your organization's policies might require.
Documenting the passwords
In large organizations, you can't get anything done without the proper changes being filed through change management. Even if your organization doesn't require these steps, it's still a recommended practice to document at least these items:
- Document the password for the built-in administrator account: When deploying a new Active Directory forest or domain, deploy using a pre-configured password for the built-in administrator account. After successful promotion, change the password to one that you intend to assign to this account for a longer period. Document the latter password in a password vault.
Tip
As domain controllers are promoted using scripts, there is a chance the password for the built-in account will linger around unintentionally. Also, the password initially set for this account is stored with a weaker hashing algorithm than changed passwords.
- Document the Directory Services Restore Mode (DSRM) password: In dire situations, when the Active Directory-related services are no longer able to start, an administrator can sign in to the server using a fallback account with the DSRM password. Intend to use different DSRM passwords for each domain controller and document these properly in a password vault.
See also
See the Creating conditional forwarders recipe in Chapter 9, Managing DNS, to create conditional forwarders.
Promoting a server to a domain controller
Promoting a Windows Server installation to a domain controller consists of three steps:
- Installing the Active Directory Domain Services role
- Promoting a server to a domain controller
- Checking proper promotion
When using dcpromo.exe, you do not have to install the role beforehand.
You can promote the server in several ways. The following table displays the possibilities:
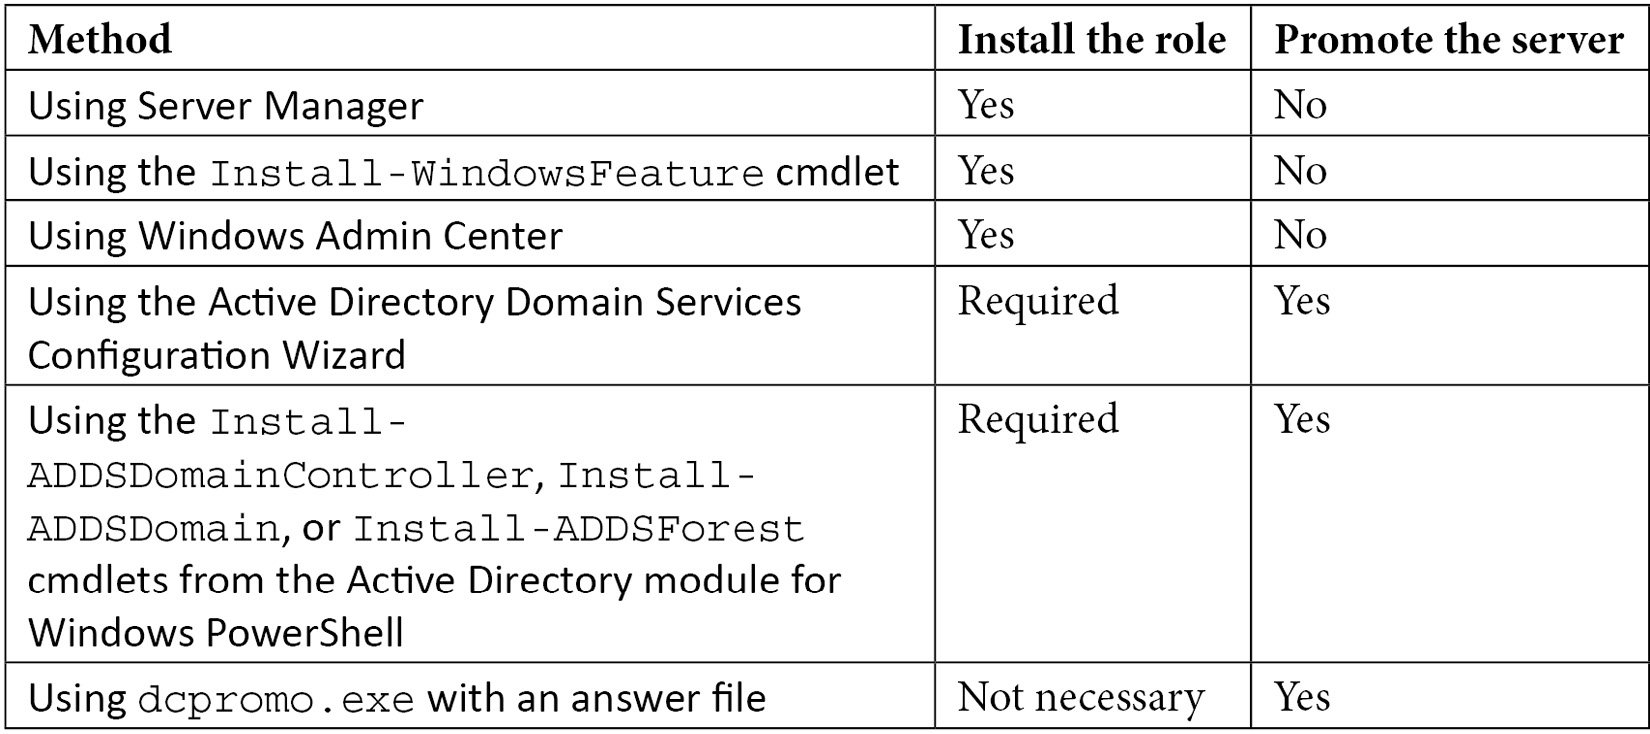
Table 2.1 – Methods for installing the Active Directory Domain Services role and promoting a server to a domain controller
The methods in the table are all explained in more detail in this recipe.
Getting ready
In some organizations, changes can only be made using scripts and must be accompanied by rollback scripts. In these cases, the answer file and PowerShell cmdlets offer the best method. On Server Core installations of Windows Server, only the last two options are available to promote the server, either on the Command Prompt or through Windows Admin Center, unless you use Server Manager to remotely manage the server you intend to promote to a domain controller.
The Active Directory Domain Services Configuration Wizard no longer features the option to not reboot the Windows Server installation intended as a domain controller after successful promotion. If you need this option – for instance, to harden the domain controller before the first boot with custom scripts – then you can't use the Wizard. Use dcpromo.exe or the Install-DDSDomainController, Install-ADDSDomain, or Install-ADDSForest cmdlets in these cases.
When creating an additional domain controller in an existing Active Directory domain or forest, check for proper Active Directory replication before implementing the new domain controller.
How to do it...
Unless you are using dcpromo.exe to promote the Windows Server installation to a domain controller, the Active Directory Domain Services role needs to be installed first.
Installing the Active Directory Domain Services role
There are three ways to install the Active Directory Domain Services role:
- Using Server Manager
- Using the
Install-WindowsFeaturecmdlet - Using Windows Admin Center
Using Server Manager
To install the Active Directory Domain Services role using Server Manager, perform these steps:
- Press Start.
- Search for Server Manager and click its corresponding search result or run
servermanager.exe. The Server Manager window appears. - In the gray top bar of Server Manager, click Manage.
- Select Add Roles and Features from the menu. The Before you begin screen appears, as shown in the following screenshot:
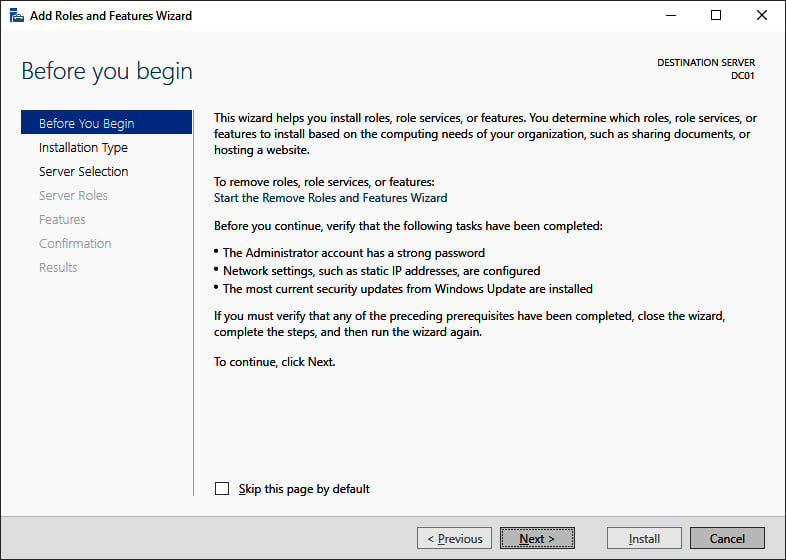
Figure 2.1 – The Before you begin screen of the Add Roles and Features Wizard
- On the Before you begin screen, click Next >.
- On the Select installation type screen, select Role-based or feature-based installation and click Next >.
- On the Select destination server screen, select either the local Windows Server installation from the server pool list, the remote Windows Server installation you intend to promote to the domain controller from the server pool list, or both types of resources.
- Click Next >.
- On the Select server roles screen, select the Active Directory Domain Services role from the list of available roles. The Add Roles and Features Wizard pop-up window appears, as shown in the following screenshot:
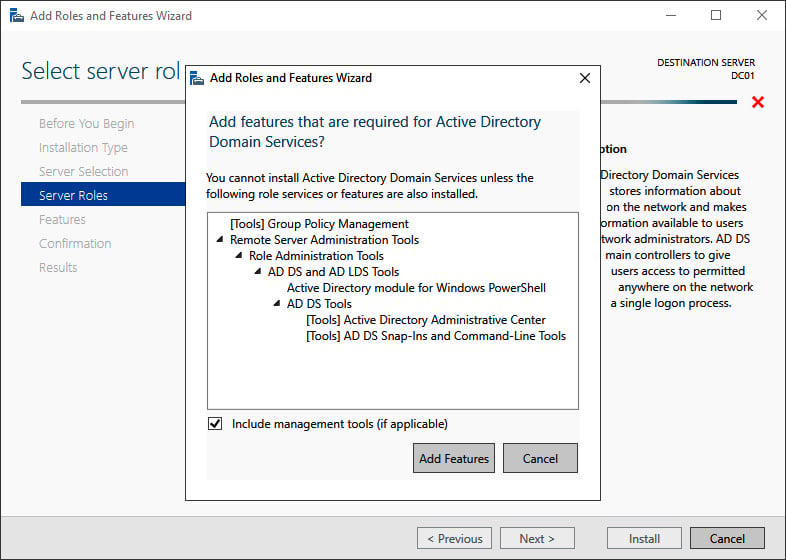
Figure 2.2 – The Add Roles and Features Wizard pop-up window
- On the pop-up screen, click the Add Features button to add the features that are required for Active Directory Domain Services. These features include the Group Policy Management tool, Active Directory module for Windows PowerShell, Active Directory Administrative Center, and AD DS Snap-Ins and Command-Line Tools.
- Back on the Select server roles screen, click Next >.
- On the Select server features screen, click Next >.
- On the Active Directory Domain Services screen, providing an overview of Active Directory and Azure AD, click Next >.
- On the Confirm installation selections screen, click Install. The role and features will now be installed:
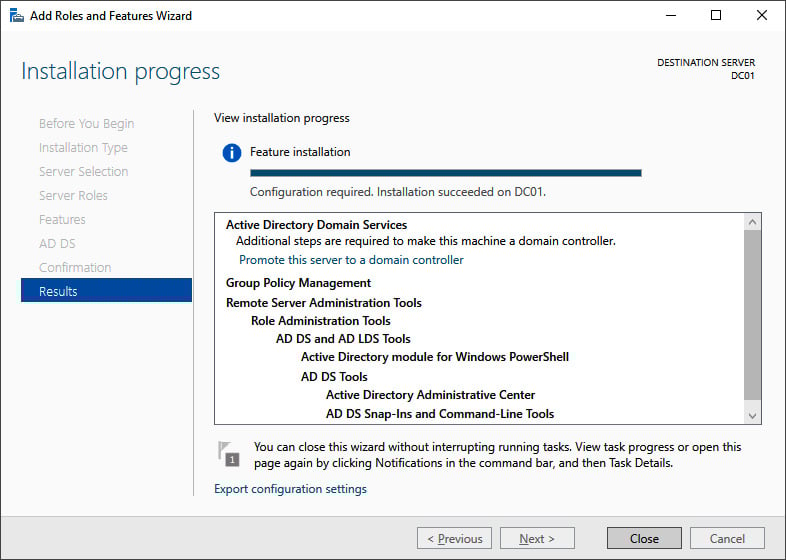
Figure 2.3 – The Installation progress page of Add Roles and Features Wizard
- When configuration of the Active Directory Domain Services server role is done, click Close to close the Add Roles and Features Wizard:
Using the Install-WindowsFeature cmdlet
As an alternative to using Server Manager, the Install-WindowsFeature cmdlet can be used. Perform the following line of Windows PowerShell in an elevated window to install the Active Directory Domain Services role:
Install-WindowsFeature AD-Domain-Services -IncludeManagementTools
The preceding line of Windows PowerShell offers the only way to install the Active Directory Domain Services role on a Server Core installation of Windows Server locally.
Using Windows Admin Center
Although a PowerShell script can be run from Windows Admin Center, it also offers a native way to install roles and features. Perform these steps:
- In Windows Admin Center, click the Windows Server installation you want to install the Active Directory Domain Services role onto from the All Connections list.
- In the left navigation menu, click Roles & features.
- In the main pane, select the Active Directory Domain Services role in the Roles and features list by clicking the selection box to the left of it:
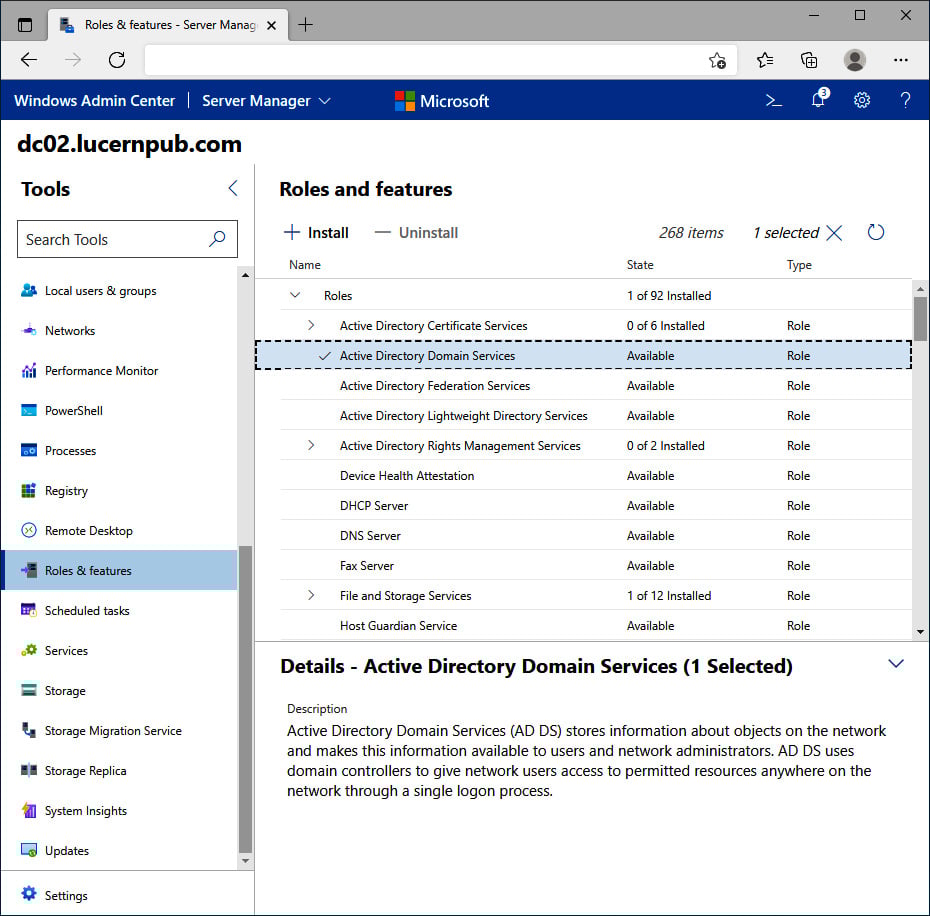
Figure 2.4 – The Active Directory Domain Services role selected in Windows Admin Center
- Click + Install. The Install Roles and Features blade appears.
- Click Yes to continue the installation with the additional Active Directory module for Windows PowerShell, Group Policy Management, AD DS Snap-Ins and Command-Line Tools, and Active Directory Administrative Center features installed.
- A notification pops up, informing you that Windows Admin Center has Successfully completed installation of Active Directory Domain Services, which appears in the notification area when the roles and features have been successfully installed.
Promoting the server to a domain controller
There are three ways to promote a Windows Server installation to a domain controller:
- Using the Active Directory Domain Services Configuration Wizard
- Using the
Install-DDSDomainController,Install-ADDSDomain, orInstall-ADDSForestcmdlets from the Active Directory module for Windows PowerShell - Using
dcpromo.exewith an answer file
Using the Active Directory Domain Services Configuration Wizard
Perform these steps to promote the server to a domain controller:
- Press Start
- Search for Server Manager, click its search result, or run
servermanager.exeor return to Server Manager when you've accomplished installing the Active Directory Domain Services role using Server Manager. - In the left navigation pane of Server Manager, click AD DS.
- Click the More... link in the blue ribbon (as shown in the following screenshot) titled Configuration required for Active Directory Domain Services at server:
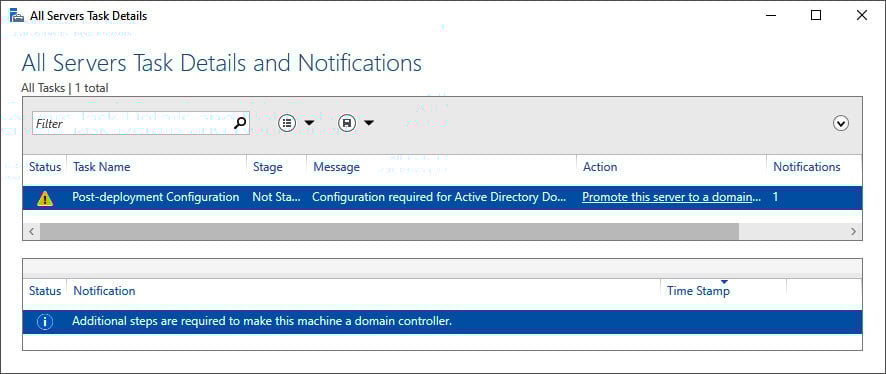
Figure 2.5 – Promote this server to a domain controller link in All Servers Task Details and Notifications
- On the All Servers Task Details and Notifications screen, follow the Promote this server to a domain controller link. The Active Directory Domain Services Configuration Wizard window appears:
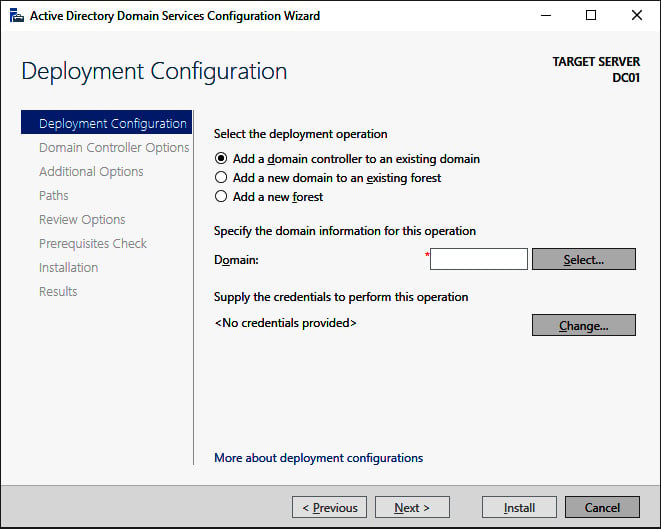
Figure 2.6 – The Deployment Configuration screen of the Active Directory Domain Services Configuration Wizard
Tip
In the top-right corner of every Active Directory Domain Services Configuration Wizard screen, it shows the hostname of the Windows Server installation that you're promoting to a domain controller.
- On the Deployment Configuration screen (as shown in the preceding screenshot), select the type of deployment you intend:
- Add a domain controller to an existing domain
- Add a new domain to an existing forest
- Add a new forest
Important Note
By default, the Add a domain controller to an existing domain option is selected. This option will create a replica domain controller in the domain. If you're not sure which selection to make, please refer to the Choosing between a new domain or forest recipe in Chapter 1, Optimizing Forests, Domains, and Trusts. The More about deployment configurations link at the bottom of the Deployment Configuration screen provides a Microsoft link with more information.
- Depending on your choices on the Deployment Configuration screen, supply information for the Domain or Credentials fields. Click Next to proceed to the next screen.
- In all the other Active Directory Domain Services Configuration Wizard screens, make the appropriate choices for the deployment scenario. Click Next > every time to proceed to the next screen, until you reach the Review Options screen:
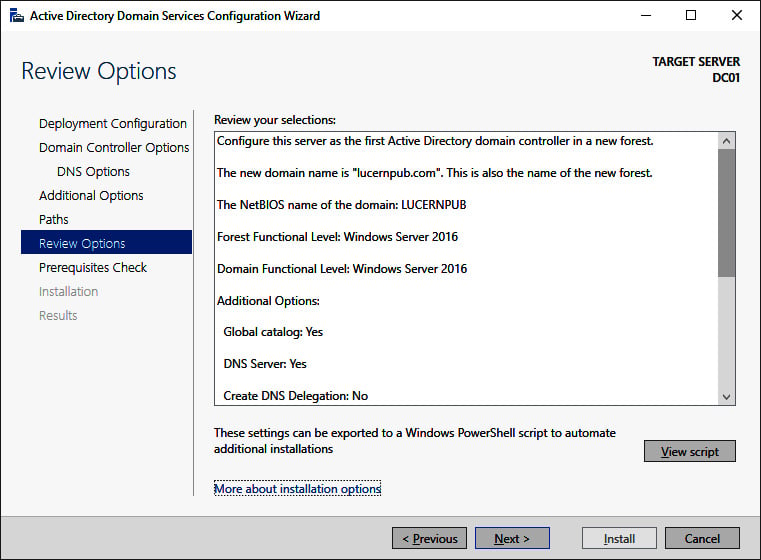
Figure 2.7 – The Review Options screen of the Active Directory Domain Services Configuration Wizard
- On the Review Options screen, review the choices made. Click Next> to proceed to the Prerequisites Check screen.
Tip
The Review Options screen features a button labeled View script. This button displays the Windows PowerShell script used to execute the domain controller promotion. This reusable script may be a real timesaver, especially when adding several domain controllers to an existing domain.
- After the prerequisites checks have been performed, click Install on the Prerequisites Check screen to start promotion.
After successful promotion, the Windows Server installation reboots as a domain controller.
Promoting a domain controller using Windows PowerShell
For the Active Directory module for Windows PowerShell, Microsoft has decided to take a slightly different route. Instead of using a single PowerShell cmdlet to promote a domain controller, there are three separate PowerShell cmdlets for each of the three scenarios, as presented on the Deployment Configuration screen of the Active Directory Domain Services Configuration Wizard:

Table 2.2 – Windows PowerShell cmdlets per domain controller promotion scenario
To add a domain controller to an existing domain, the simplest script would look like this:
Install-ADDSDomainController -DomainName lucernpub.com
However, to add a domain controller to an existing domain, as you would in the previous example, the following script would suffice:
Install-ADDSDomainController -DomainName lucernpub.com -Credential (Get-Credential) -installDNS:$true -NoGlobalCatalog:$false -DatabasePath "E:\NTDS" -Logpath "E:\Logs" -SysvolPath "E:\SYSVOL" -Sitename RemoteLocation
This adds a domain controller to the lucernpub.com Active Directory domain, using credentials you will be prompted for securely. The domain controller is installed with a DNS server and configured as a global catalog server. All the Active Directory-related files are stored in corresponding folders on the E:\ drive, and when successful, the Windows Server installation you intend as the domain controller reboots automatically.
Replace the values in the preceding sample script with the values of your choice.
Promoting a domain controller using dcpromo.exe
Despite many news outlets reporting that dcpromo is dead, the popular option to promote a Windows Server installation to a domain controller is alive and well, even in the latest Windows Server versions. One change to the functionality of dcpromo.exe, when compared to previous versions of Windows Server, is that you can no longer use dcpromo.exe to launch the Active Directory Domain Services Configuration Wizard. You'll need to use dcpromo.exe with an answer file or with all the installation arguments specified.
The benefits of using dcpromo.exe include the use of many options that are not available when using the Active Directory Domain Services Configuration Wizard and also a wide array of sample answer files and scripts. As the type of answer files used when using dcpromo.exe, and the arguments for use on the command line, have been available since the early days of Windows Server, many people have used them, and many people have written them.
Using dcpromo.exe with an answer file consists of running the following command prompt line:
dcpromo.exe /unattend: C:\install\dcpromo.txt
Simply replace the text file location with the file of your choice.
You can also use network paths such as \\server\promotiontext$\dcpromo.txt to supply an answer file to dcpromo.txt. This makes for an ideal scenario where files don't remain lingering on domain controllers promoted this way.
The answer file consists of several arguments. Typical arguments found in the answer file include the ReplicaOrNewDomain, InstallDNS, and ConfirmGC arguments. A prime example of an answer file to add an additional domain controller to an existing domain would look like the following:
[DCINSTALL]
ReplicaorNewDomain= replica
ReplicaDomainDNSName= lucernpub.com
UserDomain= LUCERNPUB
UserName= Administrator
SiteName= RemoteLocation
Password= "P@$$w0rd"
InstallDNS= Yes
ConfirmGC= Yes
CreateDNSDelegation= No
LogPath= E:\Logs
SYSVOLPath= E:\SYSVOL
SafeModeAdminPassword= "P@$$w0rd"
RebootOnSuccess= true
Using this answer file adds a domain controller to the lucernpub.com Active Directory domain, using the credentials for the administrator account with the P@$$w0rd password. The domain controller is installed with a DNS server and configured as a global catalog server. All the Active Directory-related files are stored in corresponding folders on the E:\ drive, and when successful, the Windows Server installation you intend as the domain controller will be rebooted automatically.
Replace the values in the preceding sample file with the values of your choice.
When promotion is successful, the passwords specified as the values for the Password and SafeModeAdminPassword arguments are cleared from the answer file. However, when promotion is unsuccessful, these values remain and may cause harm when falling into the wrong hands.
The arguments in the answer file can also be specified as command-line arguments. The arguments can be reused one on one, so the preceding sample answer file would correspond to the following command line:
dcpromo.exe /unattend /replicaornewdomain:Replica /replicadomaindnsname:lucernpub.com /userdomain:LUCERNPUB /username:administrator /password:"P@$$w0rd" /sitename:RemoteLocation /installdns:yes /confirmgc:yes /databasepath:"E:\NTDS" /logpath:"E:\logs" /sysvolpath:"E:\sysvol" /safemodeadminpassword:"P@$$w0rd"
Replace the values in the preceding sample file with the values of your choice.
Checking proper promotion
After promoting a Windows Server installation to the domain controller, it's recommended to check for proper promotion. Perform these steps to check the promotion:
- Check the logs: The following two files contain all the actions performed when promoting the Windows Server installation to the domain controller. A good way to check for improper promotion is to search for lines containing errors and warnings:
C:\Windows\Debug\dcpromo.logC:\Windows\Debug\dcpromoui.log
- Check the event viewer: In the event viewer (
eventvwr.exe), new dedicated logs are created for Active Directory. Search these logs for any Active Directory-related errors. - Run Windows Update: Even though one of the recommended steps is to update the Windows Server installation you intend to promote to the domain controller, it's also a recommended step to install Windows Updates after the Windows Server installation has been promoted, as updates apply to newly installed server roles and features too. These role-specific updates are only applied after the role is installed.
See also
For more information, refer to the following recipes:
- See the Preparing a Windows server to become a domain controller recipe.
- See the Promoting a server to a read-only domain controller recipe.
- See the Checking replication recipe.
Promoting a server to a read-only domain controller
Read-only domain controllers were introduced with Windows Server 2008. They have been hugely popular for providing Active Directory Domain Services to branch offices and small perimeter networks.
Read-only domain controllers are the ideal type of domain controllers for environments with the following:
- Poor physical security
- Relatively few user accounts and/or devices
- Relatively poor bandwidth to central data centers with domain controllers
- Little local IT knowledge and/or experience
These characteristics are typically true for branch offices. Before read-only domain controllers, administrators had to make the hard choice between doing nothing, placing fully (read-write) domain controllers in these locations, or upgrading the available bandwidth and/or resiliency of the networking connections between the branch offices and the head office or central data center(s).
Some organizations have opted to deploy read-only domain controllers in perimeter networks. Microsoft supports only one read-only domain controller per Active Directory site. This way, any perimeter network deployment would not have much Active Directory resiliency. Many organizations have, therefore, opted for a separate Active Directory forest for these implementation scenarios.
Getting ready
Read-only domain controllers have requirements that we need to adhere to before we can deploy and use them:
- At least one domain controller running Windows Server 2008 (or a newer version of Windows Server).
- The Windows Server 2003 Forest Functional Level (FFL), or a higher FFL.
- The Windows Server 2008 Domain Functional Level (DFL), or a higher DFL, for the Active Directory domain(s) in which you intend to implement read-only domain controllers.
ADPrep /rodcprepneeds to have run at least once on the domain controller holding the Domain Naming Master FSMO role, but this step may be skipped when the Active Directory environment was never set up or has never run with pre-Windows Server 2008-based domain controllers.- When implementing read-only domain controllers for branch offices, create the corresponding Active Directory sites and site connections first.
- Check for proper Active Directory replication before implementing a read-only domain controller.
Read-only domain controllers allow for scoped replication. It's a recommended practice to determine the user accounts and computer accounts that are strictly needed in the branch office location. The read-only domain controller will be able to cache the passwords for these accounts to speed up authentication for these accounts in the branch office. The Allowed RODC Password Replication Group is the default group in which to add (groups of) user accounts and computer accounts for this functionality.
If you desire strict group memberships for this functionality per read-only domain controller, create the groups you need before you promote the Windows Server installation to a read-only domain controller for which you need the group scope.
Another way to think about security before promoting the first read-only domain controller is to determine the privileged accounts and otherwise sensitive accounts for which you do not want passwords replicated to the read-only domain controller you intend to create. These (groups of) accounts can be specified as the accounts that are denied from replicating passwords to the RODC.
How to do it...
Just like read/write domain controllers, promoting a Windows Server installation to a read-only domain controller consists of three steps:
- Installing the Active Directory Domain Services role
- Promoting a server to a domain controller
- Checking proper promotion
When using dcpromo.exe, you do not have to install the role beforehand.
There are several ways to promote the server. The following table displays the possibilities:
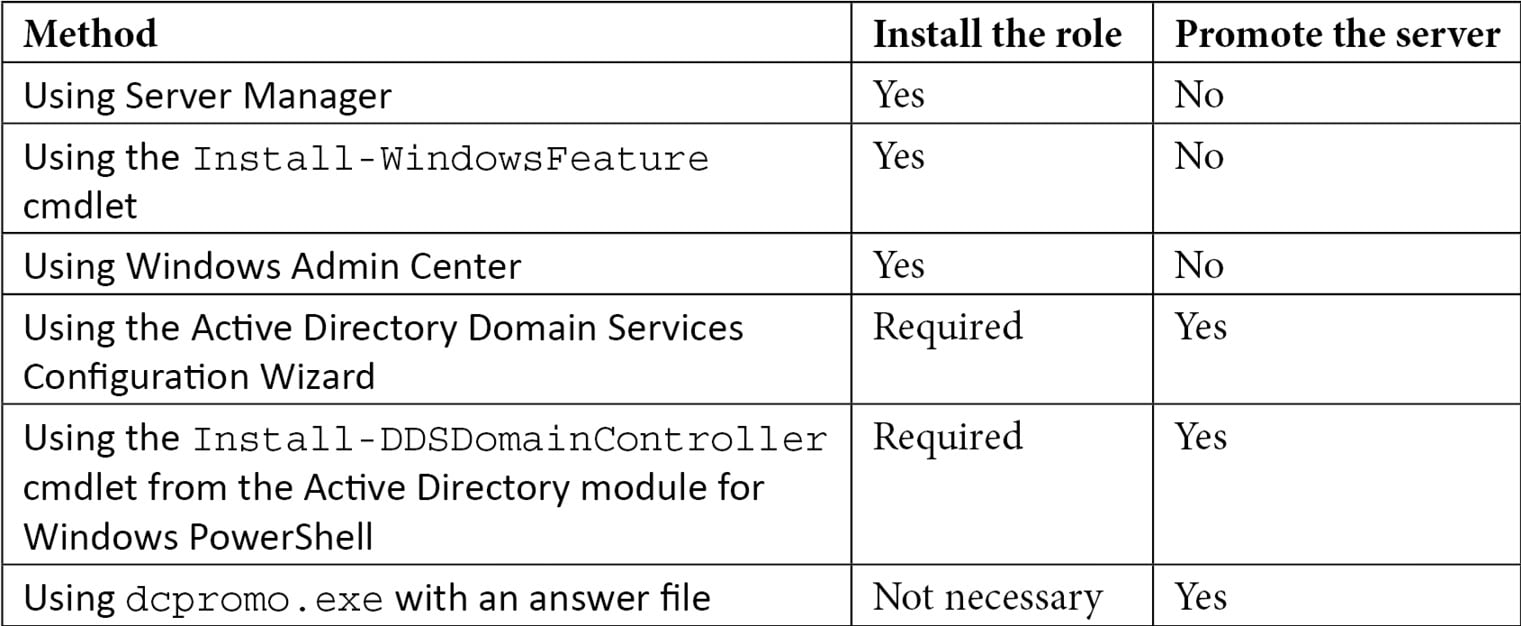
Table 2.3 – Methods for installing the Active Directory Domain Services role and promoting a server to a domain controller
The methods in the table are all explained in more detail in this recipe.
Installing the Active Directory Domain Services role
There are three ways to install the Active Directory Domain Services role:
- Using Server Manager
- Using the
Install-WindowsFeaturecmdlet - Using Windows Admin Center
Using Server Manager
To install the Active Directory Domain Services role using Server Manager, perform these steps:
- Press Start.
- Search for Server Manager and click its corresponding search result or run
servermanager.exe. The Server Manager window appears. - In the gray top bar of Server Manager, click Manage.
- Select Add Roles and Features from the menu. The Add Roles and Features Wizard window appears, with the Before you begin screen.
- On the Before you begin screen, click Next >.
- On the Select installation type screen, select Role-based or feature-based installation and click Next >.
- On the Select destination server screen, select either the local Windows Server installation from the server pool list, the remote Windows Server installation you intend to promote to the domain controller from the server pool list, or both types of resources.
- Click Next >.
- On the Select server roles screen, select the Active Directory Domain Services role from the list of available roles. The Add Roles and Features Wizard pop-up window appears.
- On the pop-up screen, click the Add features button to add the features that are required for Active Directory Domain Services. These features include the Group Policy Management tool, Active Directory module for Windows PowerShell, Active Directory Administrative Center, and AD DS Snap-Ins and Command-Line Tools.
- Back on the Select server roles screen, click Next >.
- On the Select server features screen, click Next >.
- On the Active Directory Domain Services screen, providing an overview of Active Directory and Azure AD, click Next >:
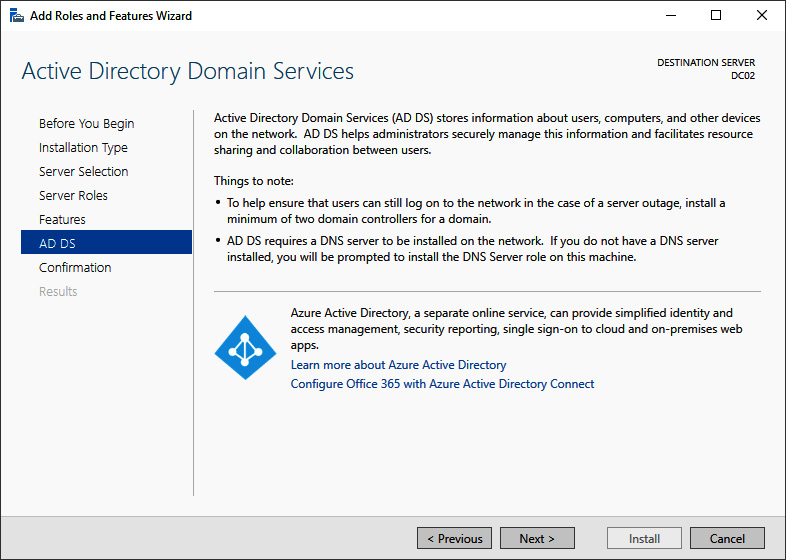
Figure 2.8 – Methods for installing the Active Directory Domain Services role and promoting a server to a domain controller
- On the Confirm installation selections screen, click Install.
- When configuration of the Active Directory Domain Services server role is done, click Close to close the Add Roles and Features Wizard.
Using the Install-WindowsFeature cmdlet
As an alternative to using Server Manager, the Install-WindowsFeature cmdlet
can be used. Perform the following line of Windows PowerShell in an elevated window to install the Active Directory Domain Services role:
Install-WindowsFeature AD-Domain-Services -IncludeManagementTools
The preceding line of Windows PowerShell offers the only way to install the Active Directory Domain Services role on a Server Core installation of Windows Server locally.
Using Windows Admin Center
Although a PowerShell script can be run from the Windows Admin Center, it also offers a native way to install roles and features. Perform these steps:
- In the Windows Admin Center, click the Windows Server installation you want to install the Active Directory Domain Services role onto from the list of All Connections.
- In the left navigation menu, click Roles & features.
- In the main pane, select the Active Directory Domain Services role from the Roles and features list by clicking the selection box to the left of it.
- Click + Install. The Install Roles and Features blade appears.
- Click Yes to continue the installation with the additional Active Directory module for Windows PowerShell, Group Policy Management, AD DS Snap-Ins and Command-Line Tools, and Active Directory Administrative Center features installed.
- A notification pops up informing you that Windows Admin Center has Successfully completed installation of Active Directory Domain Services, which appears in the notification area when the roles and features have been successfully installed.
Promoting the server to a domain controller
There are three ways to promote a Windows Server installation to a read-only domain controller:
- Using the Active Directory Domain Services Configuration Wizard
- Using the
Install-ADDSDomainControllercmdlet from the Active Directory module for Windows PowerShell with the dedicated-ReadOnlyReplicaparameter - Using
dcpromo.exewith an answer file
Using the Active Directory Domain Services Configuration Wizard
Perform these steps to promote the server to a read-only domain controller:
- Press Start.
- Search for Server Manager, click its search result, or run
servermanager.exeor return to Server Manager when you've accomplished installing the Active Directory Domain Services role using Server Manager. - In the left navigation pane, click AD DS.
- Click the More... link in the yellow ribbon titled Configuration required for Active Directory Domain Services at server.
- In All Servers Task Details and Notifications, follow the Promote this server to a domain controller link. The Active Directory Domain Services Configuration Wizard window appears.
- On the Deployment Configuration screen, select Add a domain controller to an existing domain. Then, input the DNS domain name and administrator credentials for the Active Directory domain for which you intend to add a read-only domain controller. Click Next > to proceed to the Domain Controller Options screen:
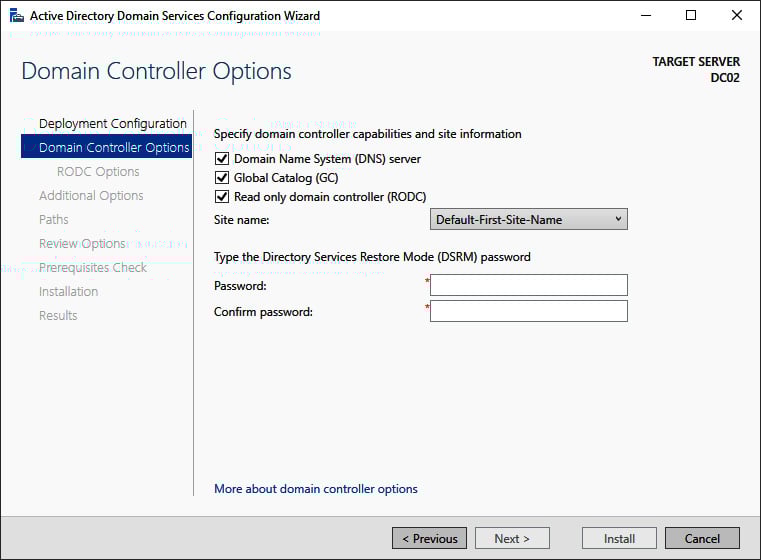
Figure 2.9 – The Domain Controller Options screen of the Active Directory Domain Services Configuration Wizard
- On the Domain Controller Options screen, we're presented with a few options:
- Select the Read only domain controller (RODC) option.
- When preferred, select the Domain Name System (DNS) server and Global Catalog (GC) options.
- Select a site name from the drop-down list of available Active Directory sites.
- Enter the Directory Services Restore Mode password for the intended read-only domain controller.
- Click Next > to proceed to the RODC Options screen:
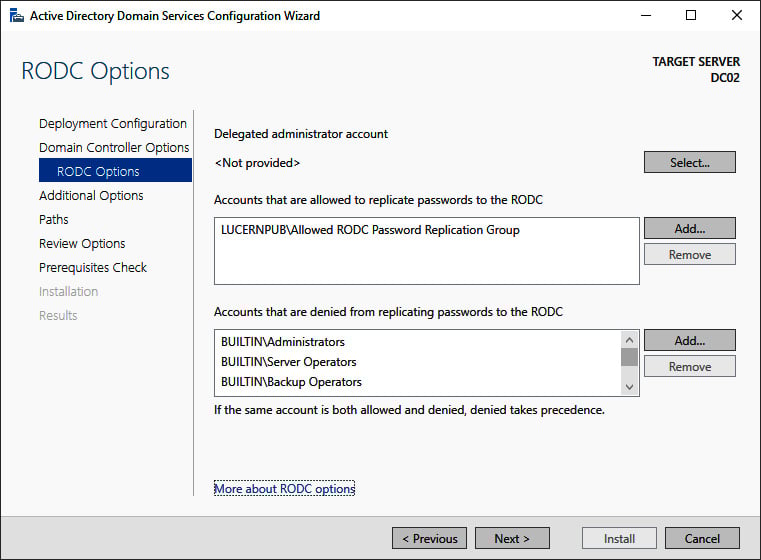
Figure 2.10 – The RODC Options screen of the Active Directory Domain Services Configuration Wizard
- On the RODC Options page, perform the following optional actions:
- Select a user account for delegation.
- Select Accounts that are allowed to replicate passwords to the RODC.
- Select Accounts that are denied from replicating passwords to the RODC.
Tip
If a group or an account features in both the accounts that are allowed to replicate passwords to the RODC and accounts that are denied from replicating passwords to the RODC, then the group or account is denied from replicating passwords to the RODC.
- Click Next > to proceed to the next screen.
- On the Additional Options screen, optionally select a fully writable domain controller from which to replicate the Active Directory database and the Active Directory
SYSVOL. Click Next > to continue to the Paths screen:
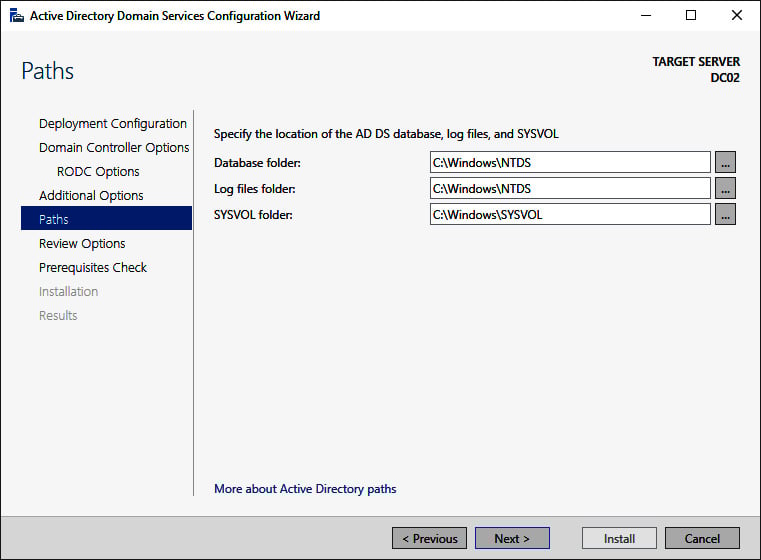
Figure 2.11 – The Paths screen of the Active Directory Domain Services Configuration Wizard
- On the Paths screen, verify the default locations underneath
C:\Windowsor change the values to store Active Directory-related files somewhere else. - Click Next > to proceed.
- On the Review Options screen, review the choices made. Click Next > to proceed to the Prerequisites Checks screen.
Tip
The Review Options screen features a button labeled View script. This button displays the Windows PowerShell script used to execute the read-only domain controller promotion. This reusable script may be a real timesaver, especially when adding several read-only domain controllers to an existing domain.
- After the prerequisites checks have been performed, click Install on the Prerequisites checks screen to start promotion.
After successful promotion, the Windows Server installation will reboot as a read-only domain controller.
Promoting a read-only domain controller using Windows PowerShell
For the Active Directory module for Windows PowerShell, Microsoft does not offer a dedicated PowerShell cmdlet to add a read-only domain controller. Instead, Install-ADDSDomainController is used with the dedicated -ReadOnlyReplica parameter. The simplest script would look like the following code:
Install-ADDSDomainController -DomainName lucernpub.com -Sitename RemoteLocation -ReadOnlyReplica
However, to add a read-only domain controller to an existing domain as you would with the previous example, the following script would be needed:
Install-ADDSDomainController -DomainName lucernpub.com -Credential (Get-Credential) -ReadOnlyReplica -installDNS:$true -NoGlobalCatalog:$false -DatabasePath "E:\NTDS" -Logpath "E:\Logs" -SysvolPath "E:\SYSVOL" -Sitename RemoteLocation
This will add a read-only domain controller to the lucernpub.com Active Directory domain using credentials you will be prompted for securely. The domain controller will be installed with a DNS server and configured as a global catalog server. All the Active Directory-related files are stored in corresponding folders on the E:\ drive, and, when successful, the Windows Server installation you intend as the domain controller will be rebooted automatically.
Replace the values in the preceding sample script with the values of your choice.
Promoting a read-only domain controller using dcpromo.exe
Read-only domain controllers can be promoted using dcpromo.exe with an answer file or with all the installation arguments specified, just like fully writable domain controllers. An added benefit is that dcpromo.exe will install the Active Directory Domain Services server role automatically when it's not yet present.
Using dcpromo.exe with an answer file consists of running the following command line:
dcpromo.exe /unattend: C:\install\dcpromo.txt
A prime example of an answer file to add a read-only domain controller would look like this:
[DCINSTALL]
ReplicaorNewDomain= readonlyreplica
ReplicaDomainDNSName= lucernpub.com
UserDomain= LUCERNPUB
UserName= Administrator
SiteName= RemoteLocation
Password= "P@$$w0rd"
InstallDNS= Yes
ConfirmGC= Yes
CreateDNSDelegation= No
DatabasePath= E:\NTDS
LogPath= E:\Logs
SYSVOLPath= E:\SYSVOL
SafeModeAdminPassword= "P@$$w0rd"
RebootOnSuccess= true
The preceding answer file adds a read-only domain controller to the lucernpub.com Active Directory domain, using the credentials for the administrator account with the P@$$w0rd password. The read-only domain controller is installed with a DNS server and configured as a global catalog server. All the Active Directory-related files are stored in corresponding folders on the E:\ drive, and when successful, the Windows Server installation you intend as the read-only domain controller is rebooted automatically.
Replace the values in the preceding sample file with the values of your choice.
The arguments in the answer file can also be specified as command-line arguments. The arguments can be reused one on one, so the preceding sample answer file would correspond to the following command line:
dcpromo.exe /unattend /replicaornewdomain:ReadOnlyReplica /replicadomaindnsname:lucernpub.com /userdomain:LUCERNPUB /username:administrator /password:"P@$$w0rd" /sitename:RemoteLocation /installdns:yes /confirmgc:yes /databasepath:"E:\NTDS" /logpath:"E:\logs" /sysvolpath:"E:\sysvol" /safemodeadminpassword:"P@$$w0rd"
Replace the values in the preceding command line with the values corresponding to your environment.
Checking proper promotion
After promoting a Windows Server installation to a read-only domain controller, it's recommended practice to check for proper promotion. Perform these steps to check:
- Check the logs: The following two files contain all the actions performed when promoting the Windows Server installation to a domain controller. A good way to check for improper promotion is to search for lines containing errors and warnings, logged in the following files:
C:\Windows\Debug\dcpromo.logC:\Windows\Debug\dcpromoui.log
- Check the event viewer: In the event viewer,
eventvwr.exe, new dedicated logs are created for Active Directory Domain Services. Search these logs for any Active Directory-related errors. - Run Windows updates: Even though one of the recommended steps is to update the Windows Server installation you intend to promote to a read-only domain controller, it's also a recommended step to install Windows updates after the Windows Server installation has been promoted, as updates apply to the newly installed server roles and features too. These role-specific updates are only applied after the role is installed.
How it works...
Read-only domain controllers are different from normal domain controllers in the following ways:
- They allow read-only access to the Active Directory database and SYSVOL. Read-only domain controllers refer to other domain controllers for write operations such as SYSVOL.
- They allow read-only access to the DNS records. Read-only domain controllers refer to other domain controllers for DNS registration requests.
- They allow for scoped replication, so only the accounts that are needed in the Active Directory site where the read-only domain controller is placed are synchronized. This way, privileged accounts and other sensitive accounts remain in the central data center.
- They allow for a quick change of passwords for synchronized users when the read-only domain controller is stolen or otherwise compromised.
- They use their own dedicated account to encrypt their Kerberos tickets. This prevents attackers from decrypting a Kerberos Ticket Granting Ticket (TGT), issued by a read-only domain controller, to obtain the secret of the Kerberos account (
krbtgt).
Additionally, because no Active Directory writes are expected from read-only domain controllers, normal domain controllers don't replicate from them.
See also
For more information, refer to the following recipes:
- See the Preparing a Windows server to become a domain controller recipe.
- See the Promoting a server to a domain controller recipe.
- See the Creating an Active Directory site recipe in Chapter 16, Hardening Azure AD.
- See the Checking replication recipe in Chapter 16, Hardening Azure AD.
Using Install From Media
For Active Directory environments with really low bandwidth or networking resiliency between locations with domain controllers, regardless of whether these are read-only domain controllers or fully writable domain controllers, promoting a Windows Server installation to a domain controller can take a long time or even fail.
In these types of scenarios, for adding an additional domain controller or read-only domain controller to an existing domain, Microsoft offers the Install From Media (IFM) option.
Getting ready
When creating IFM media, check for proper Active Directory replication before creating the IFM media on the domain controller. This ensures that the domain controller is up to date with all changes in Active Directory.
Create a folder on the source and destination domain controller to store the files needed for IFM.
How to do it...
IFM consists of two steps:
- Creating the
IFMpackage - Leveraging the
IFMpackage
Creating the IFM package
To create the IFM package, perform the following actions on a domain controller in a well-connected networking location, running the same version of Windows Server on which you intend to use the IFM package to swiftly promote it to a domain controller in a low-bandwidth scenario:
Tip
IFM packages to create read-only domain controllers can be created on both read-only domain controllers and on fully writable domain controllers. IFM packages to create fully writable domain controllers can only be created on fully writable domain controllers.
- Sign in interactively to the domain controller that you want to use as the source server for IFM.
- Press Start.
- Search for Command Prompt, right-click its search result, and choose Run as administrator from the context menu. Alternatively, run
cmd.exe, but instead of running it by pressing Enter, press Ctrl, Shift, and Enter. - Run the following command to start the NTDS utility in interactive mode:
ntdsutil.exe
- Type the following command in interactive mode to select the Active Directory database:
activate instance ntds
- Type the following command in interactive mode to enter the
IFMcreation context:IFM
- Type the following command in interactive mode to create
IFM, including the contents of the Active DirectorySYSVOLfor a read-only domain controller, and place it in theC:\IFMfolder:create RODC C:\IFM
- Type the following command in interactive mode to exit the
IFMcontext:quit
- Type the following command in interactive mode to exit the NTDS utility itself:
quit
- Close the Command Prompt window.
Leveraging the IFM package
To leverage the IFM package on the destination domain controller in the remote location, choose one of the following methods:
- Using the Active Directory Domain Services Configuration Wizard after you've installed the Active Directory Domain Services role
- Using
dcpromo.exe - Using the
Install-ADDSDomainControllerPowerShell cmdlet
Using the Active Directory Domain Services Configuration Wizard
Perform these steps to leverage the install using the Active Directory Domain Services Configuration Wizard:
- Promote the Windows Server installation as you would normally.
- On the Additional Options screen, click the Install from media option:
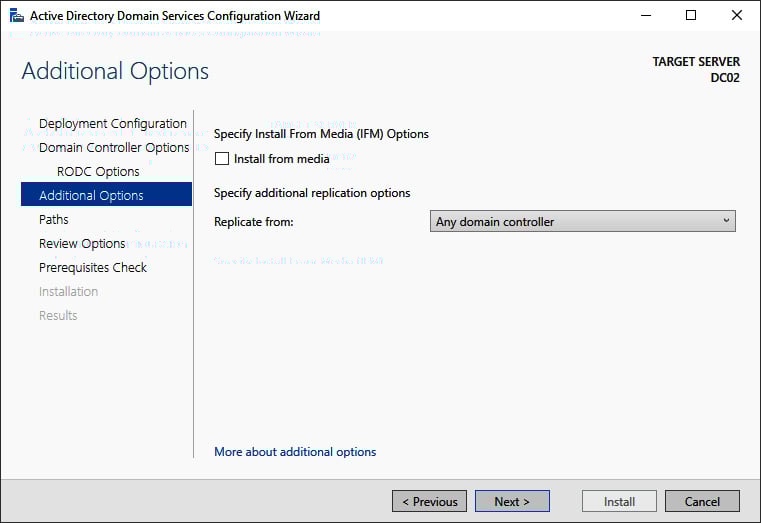
Figure 2.12 – The Additional Options screen of the Active Directory Domain Services Configuration Wizard
- On the Install from Media screen, specify the location on the drive of the Windows Server installation you intend to promote to a (read-only) domain controller using the Install from Media option.
- Optionally, specify the fully writable domain controller you want to replicate from. Specify a domain controller that is best reachable from the intended domain controller.
- Click Next > to proceed to the next screens as you normally would.
Using the Install-ADDSDomainController PowerShell cmdlet
The Install-ADDSDomainController PowerShell cmdlet only needs the -InstallationMediaPath additional parameter to leverage the IFM package when promoting a Windows Server installation to a domain controller.
When combining it with the sample PowerShell command for adding a domain controller to an existing domain, the following line of Windows PowerShell emerges:
Install-ADDSDomainController -DomainName lucernpub.com -InstallationMediaPath "C:\IFM"
Replace lucernpub.com with the DNS domain name of your Active Directory domain.
Using dcpromo.exe
As with the Install-ADDSDomainController PowerShell cmdlet, dcpromo.exe requires an optional parameter to leverage the IFM package.
Perform the following steps:
- Promote the Windows Server installation, as you would normally.
- When using an answer file, add the following line:
ReplicationSourcePath= "C:\IFM"
- When using unattended mode, add the following argument:
/ReplicationSourcePath:"C:\IFM"
How it works...
As a Windows Server installation becomes a domain controller, it replicates the contents of the Active Directory database and the Active Directory SYSVOL to its local hard drive(s). The entire package needed for this replication can also be assembled before promotion. Then, the IFM package can be delivered to the remote location, or even carried by the technician that will promote the (read-only) domain controller.
Important Note
The amount of network traffic needed when using the IFM option is heavily reduced but is certainly not zero. As the IFM package represents a point-in-time snapshot of the contents of the Active Directory database and the Active Directory SYSVOL, any changes between the time of the creation of the IFM package and using it will need to replicate before promotion of the domain controller is successfully completed.
Using domain controller cloning
The IFM feature for promoting domain controllers leverages the fact that the contents of the Active Directory database and the Active Directory SYSVOL are identical throughout all domain controllers within the domain. The domain controller cloning feature takes this one step further and leverages the fact that all domain controllers are largely identical – not just the Active Directory-related files but all operating system files, most agent installations, information security measures, and most configuration items.
When a domain controller is properly prepared and promoted, it can serve as a template.
Getting ready
The domain controller cloning feature requires the following:
- A hypervisor platform offering the VM-GenerationID functionality
- At least one domain controller running Windows Server 2012 or a newer version of Windows Server, promoted to a domain controller, holding the PDC Emulator FSMO role
The domain controller you intend to clone needs to adhere to the following requirements:
- Running Windows Server 2012 or a newer version of Windows Server
- Running on top of a VM-GenerationID-capable hypervisor platform
- Running the latest stable integration components or VMware tools
- Promoted as a domain controller
- Not holding the PDC Emulator FSMO role
- Not holding the RID Master FSMO role
When cloning domain controllers, check for proper Active Directory replication before cloning. This ensures that the domain controllers are up to date with all changes in Active Directory and can communicate the changes involved in adding a domain controller.
How to do it...
There are four steps to cloning a domain controller:
- Making sure all agents and software packages are cloneable
- Supplying the information for the new domain controller configuration
- Adding the domain controller to the Cloneable Domain Controllers group
- Cloning the domain controller from the hypervisor
Making sure all agents and software packages are cloneable
To successfully clone a domain controller, all agents and software packages that you've installed and configured on the domain controller you intend to clone need to support it.
When you install the Active Directory Domain Services role on a Windows Server 2012 installation, or on any newer version of Windows Server, there is the Get-ADDCCloningExcludedApplicationList PowerShell cmdlet that you can use. When you run this PowerShell cmdlet, it will return the applications and services that Microsoft does not know whether you can successfully clone.
All Microsoft services and add-on packages that ship with Windows Server are tested, so these are already part of the DefaultDCCloneAllowList.xml file. The contents of C:\Windows\System32\DefaultDCCloneAllowList.xml are shown as follows:
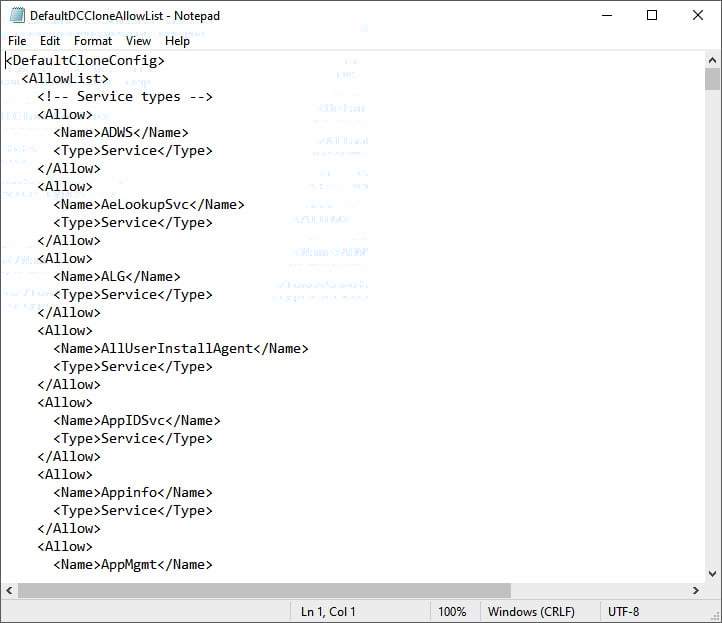
Figure 2.13 – Contents of the DefaultDCCloneAllowList.xml file
For any other service and/or application, the recommended practice is to ask the vendor whether domain controller cloning is supported. When all services and applications check out, you can run the following line of PowerShell to add them to your organization's CustomDCCloneAllowList.xml file:
Get-ADDCCloningExcludedApplicationList -GenerateXml -Path C:\Windows\NTDS -Force
In the preceding line of Windows PowerShell, the default path for the Active Directory database is supplied. Change it accordingly before running it.
After cloning, the domain controller picks up this file when you store it on removable media or in the same path as the Active Directory database.
Supplying the information for the new domain controller configuration
The new domain controller that is created when an existing domain controller is cloned will need to be different from the existing one. It will need a different hostname, IPv4 address(es), IPv6 address(es), possibly different DNS Server allocations, or a different Active Directory site.
Microsoft provides a way to supply this information through the DCCloneConfig.xml file. Again, after cloning, the domain controller picks up this file when you store it on removable media or in the same path as the Active Directory database.
If no DCCloneConfig.xml file is supplied, the new domain controller will boot into Directory Services Restore Mode.
If an empty DCCloneConfig.xml file is supplied, the new domain controller will be assigned the following:
- IP addresses through DHCP
- An automatically assigned hostname
- The same Active Directory site as the source domain controller
If a specific hostname, Active Directory site, or IP address is needed, look at the parameters you can specify for New-ADDCCloningConfig, such as the -SiteName, -CloneComputerName, and -Static -IPv4Address parameters.
A sample PowerShell one-liner to create a new domain controller with the name DC04 in the Active Directory site named RemoteLocation with the correct IPv4 information would look like the following:
New-ADDCCloneConfigFile -CloneComputerName "DC04" -SiteName RemoteLocation -Static -IPv4Address "10.0.1.3" -IPv4SubnetMask "255.255.255.0" -IPv4DefaultGateway "10.0.1.1" -IPv4DNSResolver "10.0.0.2"
Change the values for the -SiteName, -CloneComputerName, -Static, -IPv4Address, -IPv4SubnetMask, -IPv4DefaultGateway, and -IPv4DNSResolver parameters for parameters that make sense for your environment.
Adding the domain controller to the Cloneable Domain Controllers group
In large organizations, the team responsible for managing Active Directory is usually a different team from the one managing the hypervisor platform. Through the integration components and/or VMware tools, the latter team might configure domain controllers for cloning and clone them, adding to the management burden of the Active Directory management team.
Therefore, the Active Directory team must explicitly allow a domain controller to be cloned in Active Directory. The mechanism to do so is to add source domain controllers to the Cloneable Domain Controllers group.
The following line of PowerShell accomplishes this for a source domain controller named DC03 in the lucernpub.com Active Directory domain:
Add-ADGroupMember "Cloneable Domain Controllers" "CN=DC03,OU=Domain Controllers,DC=LucernPub,DC=com"
Replace the distinguishedName value of DC03 with the distinguishedName value of the domain controller you want to add to the Cloneable Domain Controllers group.
Cloning the domain controller from the hypervisor
Now, the hypervisor platform team can clone the source domain controller.
As an Active Directory administrator, shut down the domain controller you intend to clone. After cloning has been successful, remove the source domain controller from the Cloneable Domain Controllers group and start it again as one of the domain controllers for the domain, or leave it off and allow it to be cloned repeatedly for a maximum period of 60 to 180 days, depending on the current tombstone lifetime period settings.
How it works...
Domain controller cloning leverages the VM-GenerationID feature found in most modern hypervisor platforms. Through the specifications that Microsoft wrote for this feature, this ID is stored in every virtual machine's RAM and only changes under certain circumstances. These circumstances are the following:
- When a virtual machine's hard disk is attached to a different virtual machine
- When a previous snapshot for a virtual machine is applied
Active Directory Domain Services is the first server role to take advantage of the VM-GenerationID feature to do the following:
- Increase the integrity of the contents of the Active Directory database and the Active Directory SYSVOL by employing virtualization safeguards
- Clone a perfectly prepared domain controller using domain controller cloning
By storing the 128-bit value for the VM-GenerationID in RAM in the Active Directory database, and the domain controller checking the value stored in the database with the value in RAM before each major action, the domain controller can sense when a snapshot is applied or when the hard disk is reused.
Important Note
As the VM-GenerationID feature is a hypervisor platform feature, a domain controller cannot sense when a snapshot is applied or when the hard disk is reused when these actions originate from the storage fabric or otherwise outside of the hypervisor platform.
When a hard disk is reused and the domain controller is properly prepared to be cloned, domain controller cloning creates a perfect clone of the source domain controller.
Domain controller cloning only allows cloning of fully writable domain controllers. It does not apply to read-only domain controllers.
See also
Use the information in the Determining whether a virtual domain controller has a VM-GenerationID recipe to see whether the hypervisor platform supports domain controller cloning.
Refer to the Modifying the tombstone lifetime period recipe in Chapter 16, Hardening Azure AD, to find out whether domain controllers can be cloned for 60 or 180 days.
Determining whether a virtual domain controller has a VM-GenerationID
One of the requirements for Active Directory Virtualization Safeguards and domain controller cloning is the ability of the hypervisor platform to provide the VM-GenerationID to the virtual domain controller.
How to do it...
To determine whether a virtual domain controller has the VM-GenerationID, perform these steps:
- Sign in to the virtual domain controller.
- Press Start.
- Search for Device Manager and click its corresponding search result, or run
devmgmt.msc. The Device Manager window appears. - In the taskbar of Device Manager, open the View menu and select Show hidden devices.
- In the main pane of Device Manager, expand System devices.
- Search for the
Microsoft Hyper-V Generation Countersystem device. The existence of such a device means the virtual domain controller has a VM-GenerationID. - Close Device Manager.
How it works...
When the hypervisor platform supports the VM-GenerationID feature, it will create a device to place the value of the VM-GenerationID in the virtual memory of the virtual domain controller.
To determine whether a virtual domain controller has a VM-GenerationID, look for this system device.
Demoting a domain controller
Every domain controller has a life cycle. After a certain period, it should make room for newer, better, more agile, or even more cost-efficient domain controllers, or other solutions, such as Azure Active Directory Domain Services.
Getting ready
Before you demote a domain controller, you should ensure of the following:
- It no longer hosts any FSMO roles.
- It no longer offers networking services, such as DNS, LDAP, RADIUS, or WINS. These protocols are manually configured on networking devices and other servers. Demoting a domain controller that offers these services might negatively impact the networking infrastructure. Reconfigure networking devices and servers to use alternative domain controllers or services first.
- It is not an Enterprise Root Certification Authority (CA). When a domain controller is configured as an Enterprise Root CA using Active Directory Certificate Services (AD CS), it cannot be demoted. First, the CA needs to be migrated.
- There are other global catalog servers available when you remove a domain controller that is also configured to be a global catalog server.
For successful demotions, the domain controller you intend to demote needs to have at least one network interface card attached to the network. Other domain controllers should be reachable and Active Directory replication should be working properly.
How to do it...
This recipe describes two supported ways to demote a domain controller graciously:
- Using the Remove Server Roles and Features Wizard
- Using the Active Directory module for Windows PowerShell
Using the Remove Server Roles and Features Wizard
To demote a domain controller graciously using Server Manager, perform these steps:
- Press Start.
- Search for Server Manager and click its corresponding search result, or run
servermanager.exe. The Server Manager window appears. - In the gray top bar of Server Manager, click Manage.
- Select Remove Server Roles and Features from the context menu. The Remove Roles and Features Wizard window appears.
- On the Before you begin screen, click Next.
- On the Select destination server screen, select the local Windows Server installation from the server pool list, and then click Next.
- On the Select server roles screen, deselect the Active Directory Domain Services role from the list of installed roles. The Remove Roles and Features Wizard pop-up window appears.
- In the pop-up window, click the Remove Features button to remove features that are required for Active Directory Domain Services:
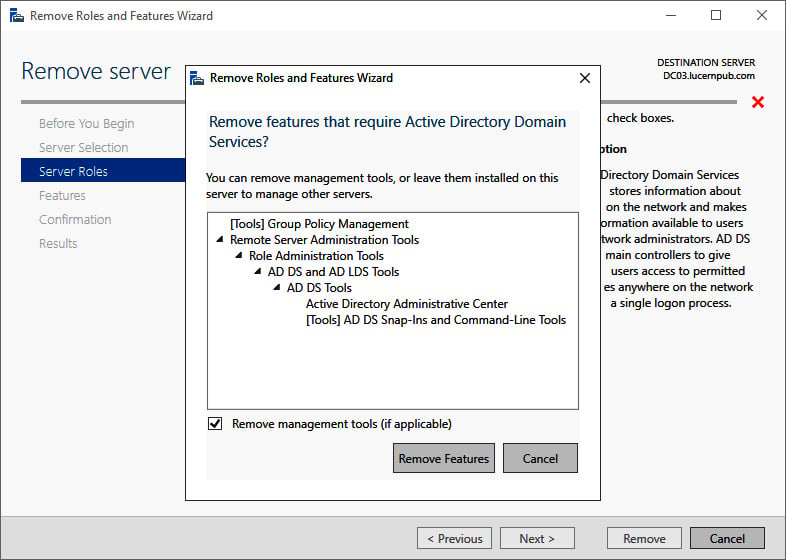
Figure 2.14 – The Remove Roles and Features Wizard pop-up screen
- On the Validation Results screen, follow the Demote this domain controller link to acknowledge that the domain controller needs to be demoted before the Active Directory Domain Services role can be removed:
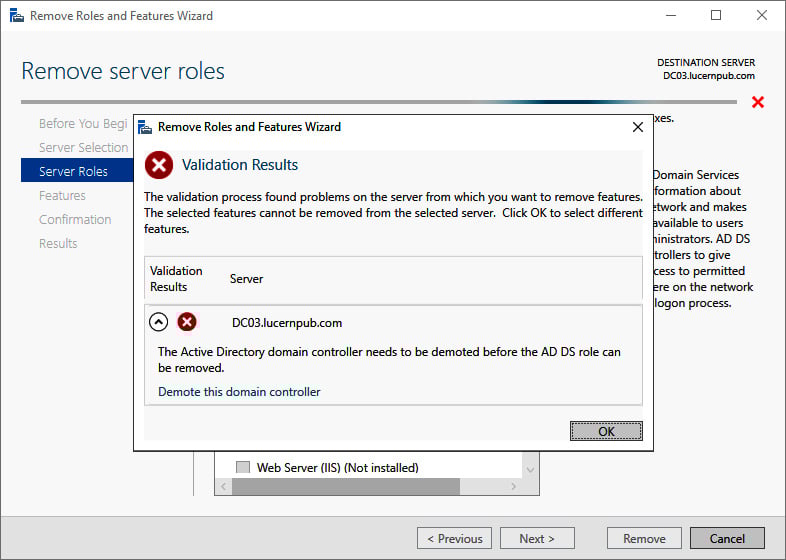
Figure 2.15 – Validation Results for the Remove Roles and Features Wizard
- The Active Directory Domain Services Configuration Wizard window appears. On the Credentials screen, optionally enter the credentials to perform the demotion, or click Next > to perform the operation with the credentials of the account you signed in with.
- On the Warnings screen, select the Proceed with removal option and click Next >:
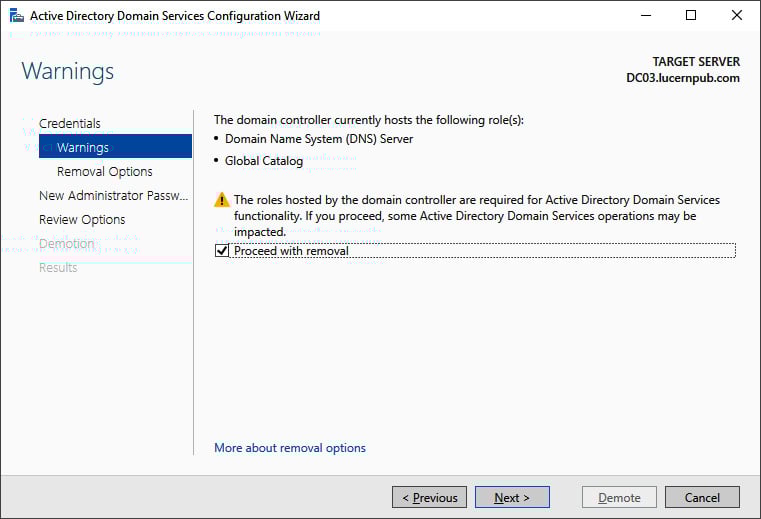
Figure 2.16 – The Warnings screen of the Active Directory Domain Services Configuration Wizard
- On the Removal Options screen, select the Remove DNS delegation option and click Next >.
- On the New administrator password screen, enter the new password for the built-in administrator account. Click Next > to proceed to the next screen.
- On the Review Options screen, click Demote.
- When configuration of the Active Directory Domain Services server role is done, click Close to close the Remove Roles and Features Wizard.
Using the Active Directory module for Windows PowerShell
To demote a domain controller graciously, you can use the Uninstall-ADDSDomainController PowerShell cmdlet like this:
Uninstall-ADDSDomainController
This removes the domain controller from the Active Directory domain and prompts you for the new password for the built-in administrator account after demotion. Replace the values in the previous sample file with the values of your choice.
To remove the Active Directory Domain Services role after demotion, use the following line of Windows PowerShell:
Uninstall-WindowsFeature AD-Domain-Services -IncludeManagementTools
The domain controller is then demoted, and the Active Directory Domain Services role is removed.
How it works...
Every domain controller has its information stored in numerous places throughout the Active Directory database.
To remove this information and stop other domain controllers from replicating to non-existing domain controllers, the domain controllers should be demoted.
There's more...
Proper demotion of a domain controller will remove all the references to the domain controller from Active Directory.
However, it is a recommended practice to check the following tools manually after demotion:
- DNS: (
dnsmgmt.msc) - Active Directory Sites and Services (
dssite.msc)
Demoting a domain controller forcefully
It's also an option to forcefully remove a domain controller from Active Directory. While graciously demoting should be the preferred option, you might have to resort to this option.
The process of demoting a domain controller forcefully consists of these steps:
- Performing a metadata cleanup
- Deleting the domain controller from DNS
- Deleting the computer object for the domain controller
- Deleting the SYSVOL replication membership
- Deleting the domain controller from Active Directory Sites and Services
- Seizing any FSMO roles that were hosted by the domain controller (you can do this first to ensure there are no impacts on domain members)
- Taking care of the existence of global catalog servers
If the domain controller was the last domain controller for a domain in an existing forest, the domain will need to be removed, as it is now an orphaned domain.
Getting ready
Although you would demote a domain controller forcefully when it no longer replicates, you should ensure that the remaining domain controllers are replicating properly.
How to do it...
This recipe describes two ways to do it:
- Using the Active Directory Domain Services Configuration Wizard
- Using manual steps
Using the Active Directory Domain Services Configuration Wizard
The Active Directory Domain Services Configuration Wizard can be used to forcefully demote a domain controller when the Windows Server installation is still bootable and you are able to sign in to it with administrative credentials.
Perform these steps:
- Press Start.
- Search for Server Manager and click its corresponding search result, or run
servermanager.exe. The Server Manager window appears. - In the gray top bar of Server Manager, click Manage.
- Select Remove Server Roles and Features from the menu.
- On the Before you begin screen, click Next >.
- On the Select destination server screen, select the local Windows Server installation from the server pool list.
- Click Next >.
- On the Select server roles screen, deselect the Active Directory Domain Services role from the list of installed roles.
- In the pop-up window, click the Remove Features button to remove features that are required for Active Directory Domain Services.
- On the Validation Results screen, follow the Demote this domain controller link to acknowledge that the domain controller needs to be demoted before the Active Directory Domain Services role can be removed.
- On the Credentials screen, select the Force the removal of this domain controller option:
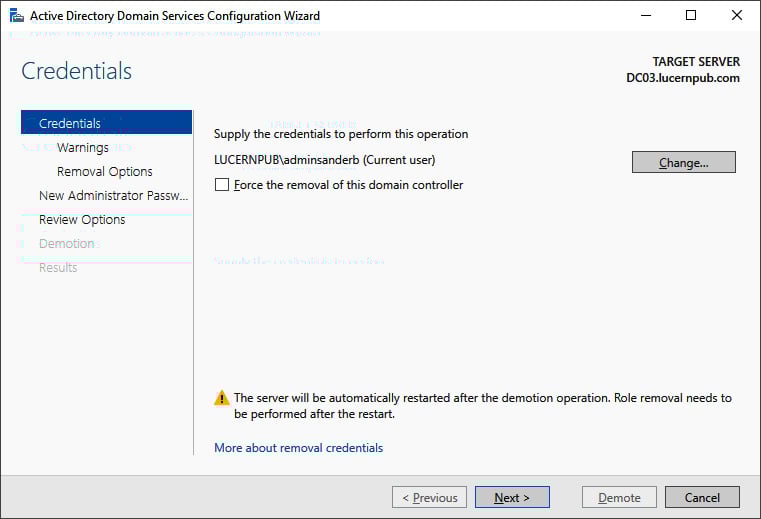
Figure 2.17 – The Credentials screen of the Active Directory Domain Services Configuration Wizard
- Click Next >.
- On the Removal options screen, select the Proceed with removal option and click Next >.
- On the New administrator password screen, enter the new password for the built-in administrator account.
- Click Next > to proceed to the next screen.
- On the Review Options screen, click Demote.
- When configuration of the Active Directory Domain Services server role is done, click Close to close the Remove Roles and Features Wizard.
Using manual steps
Sometimes, the Active Directory Domain Services Configuration Wizard cannot be used, such as in the following situations:
- You can no longer sign in interactively or remotely to the domain controller.
- The physical hardware of the domain controller has been damaged beyond repair.
- The domain controller is no longer reachable for other domain controllers.
- The domain controller, for some reason, can no longer be trusted to provide Active Directory Domain Services in a meaningful way.
In these scenarios, the following manual steps can be performed to remove the domain controller from Active Directory.
Performing metadata cleanup
Perform these steps to perform metadata cleanup:
- Sign in interactively to the domain controller that is known to be good. The domain controller holding the Domain Naming Master is preferred.
- Press Start.
- Search for Command Prompt, right-click its search result, and choose Run as administrator from the context menu. Alternatively, run
cmd.exe, but instead of running it by pressing Enter, press Ctrl, Shift, and Enter. - Run the following command to start the NTDS utility in interactive mode:
ntdsutil.exe
- Type the following command in interactive mode to start the metadata cleanup:
metadata cleanup
- Type the following command to remove the
DC04.lucernpub.comserver:remove selected server "CN=DC04,CN=Servers,CN=RemoteLocation,CN=Sites,CN=Configuration,DC=LucernPub,DC=com"
- Type the following command in interactive mode to exit the metadata cleanup context:
quit
- Type the following command in interactive mode to exit the NTDS utility itself:
quit
- Close the Command Prompt window.
Deleting the domain controller from DNS
After the metadata cleanup, the DNS records for the domain controller may still be present. Use the DNS MMC Snap-in to remove the DNS A, AAAA, PTR, and SRV records for the domain controller.
Deleting the computer object for the domain controller
To delete the computer object for the domain controller, use the Active Directory Administrative Center:
- Press Start.
- Search for Active Directory Administrative Center and click its corresponding search result, or run
dsac.exe. The Active Directory Administrative Center window appears. - In the main Welcome to Active Directory Administrative Center pane, in the GLOBAL SEARCH field, enter the search criteria of the desired object and then click the Search button:
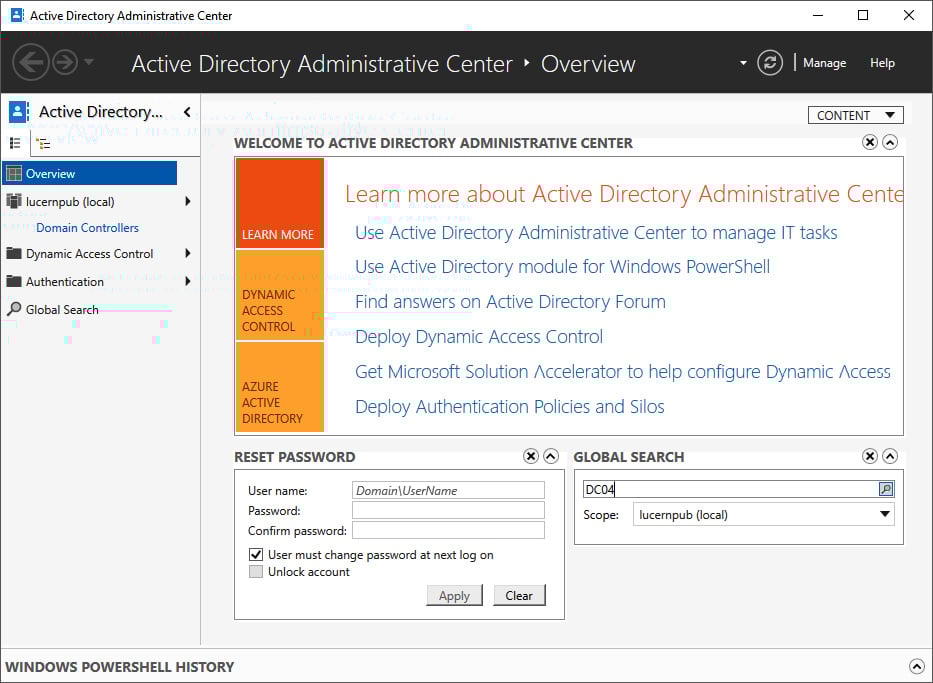
Figure 2.18 – Searching for an object using Global Search in the Active Directory Administrative Center
- From the search results, locate the domain controller object.
- Right-click it and then click Delete.
- Confirm you want to delete the domain controller.
- Close the Active Directory Administrative Center window.
To delete the computer object for the domain controller, alternatively, run the following line of Windows PowerShell:
Remove-ADComputer -Identity DC04
Replace DC04 with the name of the domain controller you want to remove.
Deleting the SYSVOL replication membership
The domain controller was also a member of the replication group for the Active Directory SYSVOL.
Perform these steps to remove the domain controller:
- Press Start.
- Search for Active Directory Administrative Center and click its corresponding search result, or run
dsac.exe. The Active Directory Administrative Center window appears. - At the top of the left navigation pane, switch to Tree view from List view.
- Expand the Active Directory domain.
- Expand the System container.
- Expand the DFSR-GlobalSettings container.
- Expand the Domain System Volume container.
- Expand the Topology container.
- In the main window, right-click the object for the domain controller you want to delete from the Topology container:
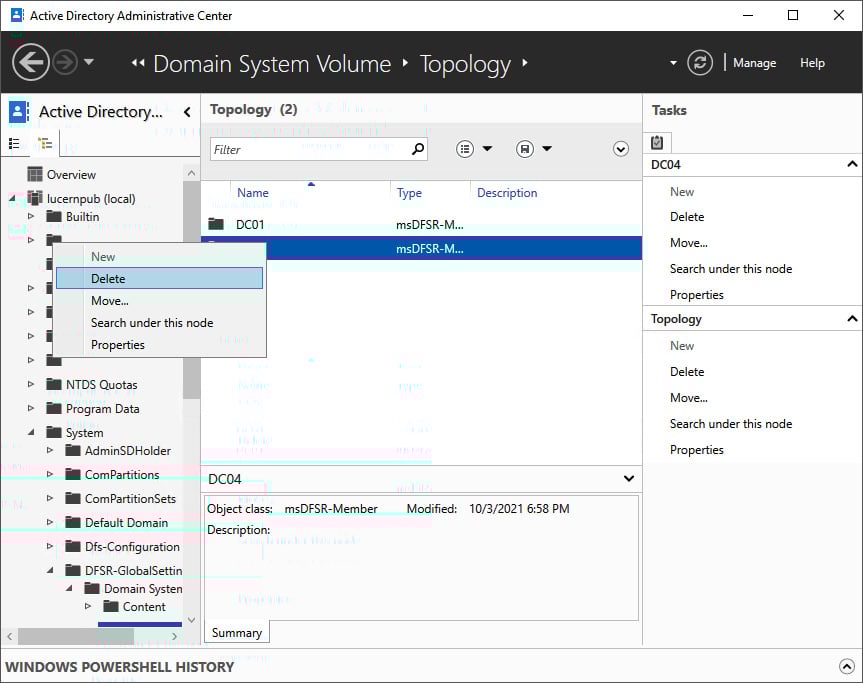
Figure 2.19 – Deleting the SYSVOL replication membership in the Active Directory Administrative Center
- Select Delete.
- In the Delete Confirmation pop-up window, click Yes to acknowledge that you are sure you want to delete msDFSR-Member.
- Close the Active Directory Administrative Center window.
Deleting the domain controller from Active Directory Sites and Services
To delete the domain controller from Active Directory Sites and Services, perform these steps:
- Press Start.
- Search for Active Directory Sites and Services and click its corresponding search result, or run
dssite.msc. The Active Directory Sites and Services window appears:
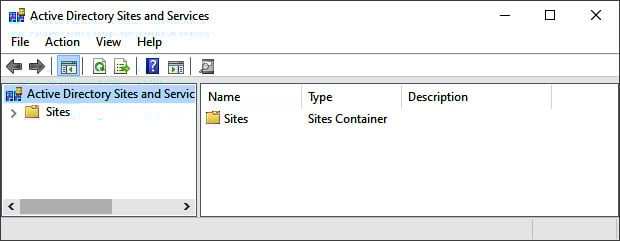
Figure 2.20 – The Active Directory Sites and Services window
- In the left navigation pane, expand Sites.
- Expand the Active Directory site where the domain controller resides.
- Expand the Servers node.
- Right-click the object for the domain controller you want to delete from the Servers node and select Delete.
- In the Active Directory Domain Services pop-up window, click Yes to acknowledge that you are sure you want to delete the server.
- Close Active Directory Sites and Services.
Deleting an orphaned domain
When you've removed the last domain controller for a domain, it becomes an orphaned domain. Perform these steps to perform a metadata cleanup for the orphaned domain:
- Sign in interactively to the domain controller that is known to be good with an account that is a member of the Enterprise Admins group. A domain controller that hasn't experienced any replication challenges throughout its lifetime might be your best choice. Also, note that performing the following actions on the domain controller holding the Domain Naming Master FSMO role is preferred.
- Press Start.
- Search for Command Prompt, right-click its search result, and choose Run as administrator from the context menu. Alternatively, run
cmd.exe, but instead of running it by pressing Enter, press Ctrl, Shift, and Enter. - Run the following command to start the NTDS utility in interactive mode:
ntdsutil.exe
- Type the following command in interactive mode to start the metadata cleanup:
metadata cleanup
- Type the following commands to specify the current domain controller as the server on which to make the changes, as it is the Domain Naming Master:
Connections
connect to server localhost
quit
- Type the following commands to list the Active Directory domains in the Active Directory forest so that you can select the domain you wish to remove:
select operation target
list domains
- This outputs a list of domains in the forest, denoted by an identifier. Note down the identifier for the orphaned domain you want to remove.
- Type the following command in interactive mode to select the domain to remove:
select domain <ID>
- Type the following command to exit the operation target selection context:
quit
- Type the following command to remove the domain:
remove selected domain
- Type the following command in interactive mode to exit the metadata cleanup context and then the NTDS utility itself:
quit
quit
- Close the Command Prompt window.
See also
To seize the FSMO roles, see the Managing FSMO roles recipe in Chapter 3, Managing Active Directory Roles and Features.
To configure domain controllers as global catalog servers, see the Managing global catalogs recipe in Chapter 3, Managing Active Directory Roles and Features.
Inventory domain controllers
It's a good thing to know all the domain controllers throughout an Active Directory domain. This activity doesn't just show the management burden for Active Directory administrators; it also allows them to make smart choices, especially when the environment is breached.
Although it's not recommended practice, administrators may place domain controllers outside the Domain Controllers Organizational Unit (OU). In that case, simply checking the computer accounts in that OU will not provide a 100% view of the domain controllers in use.
How to do it...
This recipe shows two ways to get a good overview of the domain controllers in an Active Directory domain:
- Using Active Directory Users and Computers
- Using the Active Directory module for Windows PowerShell
Using Active Directory Users and Computers to inventory domain controllers
Active Directory Users and Computers allows for querying the entire Active Directory domain for either writable domain controllers or read-only domain controllers in the following way:
- Press Start.
- Search for Active Directory Users and Computers and click its corresponding search result, or run
dsa.msc. The Active Directory Users and Computers window appears. - In the left navigation pane, right-click the target domain name with which you want to inventory the domain controllers.
- Select Find.
- From the Find drop-down box, select Computers.
- From the Role drop-down box, select Writable Domain Controllers or Read-Only Domain Controllers.
- Click Find Now.
The list of domain controllers for the domain is now shown in the search results pane.
Using the Active Directory module for Windows PowerShell to inventory domain controllers
Using the Active Directory module for Windows PowerShell to inventory domain controllers is even easier.
Simply use the following line of Windows PowerShell:
Get-ADDomainController | Select-Object Name
If you want more information on the domain controllers within the current domain, simply add the characteristics you would like to see after the Select-Object cmdlet. For instance, you can add IPv4Address, IsGlobalCatalog, isReadOnly, OperatingSystem, and Site for good measure. If you're looking for a smart layout, simply append | Format-Table. If you want to get the information straight to your clipboard so that you can paste it into a report or anywhere else, append | clip.
Decommissioning a compromised read-only domain controller
One of the benefits of deploying read-only domain controllers is their ability to recover quickly from an information security breach.
Since only the passwords for a subset of users are cached on the read-only domain controller when these users signed on through the read-only domain controller and the passwords for really sensitive accounts weren't allowed to be cached on the read-only domain controller, the impact of a stolen read-only domain controller is small, compared to a fully writable domain controller.
How to do it...
To render the read-only domain controller useless to an attacker or thief, perform these steps:
- Press Start.
- Search for Active Directory Users and Computers and click its corresponding search result, or run
dsa.msc. The Active Directory Users and Computers window appears. - In the left navigation pane, expand the domain name.
- In the left navigation pane, expand the Domain Controllers OU.
- Right-click the compromised read-only domain controller and select Delete:

Figure 2.21 – Deleting a read-only domain controller in Active Directory Users and Computers
- In the Active Directory Domain Services pop-up window, click Yes to answer the Are you sure you want to delete the Computer? question.
- On the Deleting Domain Controller screen, select the Reset all passwords for user accounts that were cached on this Read-only Domain Controller option:

Figure 2.22 – The Deleting Domain Controller window
- Since the persons associated with the user accounts will be forced to have their passwords reset by service desk personnel, it's a recommended practice to also check the Export the list of accounts that were cached on this Read-only Domain Controller to this file option and to specify a file. This way, the service desk may proactively approach affected colleagues.
- Click Delete.
- In the Delete Domain Controller pop-up window, click OK.
- In the Delete Domain Controller pop-up window, click Yes to continue with this deletion.
How it works...
Each read-only domain controller caches the hashes of the passwords for users signing in through the read-only domain controller. For this functionality, the read-only domain controller contacts a writable domain controller.
When a user account is denied having its password cached, the password is not cached. For accounts on which the passwords have been cached, the best remedy is to reset these passwords.
Every Kerberos ticket that is given to devices or user accounts is encrypted using the separate krbtgt account for the read-only domain controller. These tickets are bound to the read-only domain controller. When the read-only domain controller is removed from the Active Directory domain, these Kerberos tickets become useless.
